How to Make Tumbling Blocks
I used 2.5" strips, but you can obviously use any size you want. You'll need Light, dark and medium. I sometimes contrasted cool and warm, when the dark and medium were only slightly different in value. I especially like using Kaffe Fassett stripes for the mediums, as they add more dimension, without being too loud. For a kid's quilt, you might try using a feature fabric for the medium.
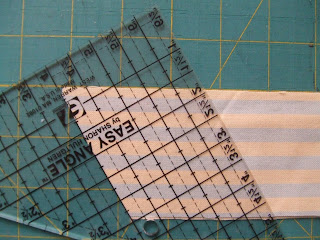
 Use a 60° angle template (or the marks on your cutting board, if you have them), for the first cut.
 I used a template with inches marked on it, to cut the parallelograms at 2.5" intervals in the strips.
 You can make a template out of cardboard, marking 1/4" seam allowances on it and then making holes where the lines cross.
This you can use to mark where your seams should start and stop when you're sewing the blocks together. Once you've done stacks of them, you probably won't need the marks anymore, but it helps to get started.
 Sew just one side of a light and dark together.
Take care that the pieces are arranged according to how you want them to be placed in the block. In this case: dark will be lower left, light on top, etc.
 Sew the medium onto the light, with a pin to mark where the seam between light and dark is.
 Pivot at this point and then sew medium to dark, being careful that the dark remains in the proper allignment when you pivot, so that the seam turns exactly where light and dark meet and the medium and dark pieces match up exactly.
 Also, be careful not to stretch the bias cut edges while sewing!

This strip piecing tutorial for Tumbling Blocks looks promising and i started to try it, but then realized it's better suited to a project that isn't so scrappy, i.e. with just three fabrics, like for a baby quilt. Also, i preferred the aesthetics of this method. After all, sometimes the viewer is not galloping by on a horse!


6 comments:
great tutorial and and another fun way to use up scraps,thank you for sharing!Christiane
Love this, and your photos are a great help.
Have to give it a try to make tumbling blocks now!
THANK YOU! I've been looking all over the web for a template. I couldn't figure out the degree angle I needed to use!
I have just started quilting and am fascinated with this technique, it looks so pretty on a quilt. Thanks for sharing the template. Hopefully I can start making some tumbling blocks of my own soon.
thanks! but how the ndo you sew thte nlocks you have made together? since you have to sew a extra seam then.
I guess I should photograph that step as well--sewing all the blocks together. I have another tumbling blocks project that still needs sewing together, so maybe will get to that soon.
But I can try to explain here in words:
You lay the blocks out in an arrangement you like. I prefer having the light side on top. You start by sewing a row of blocks together and then sewing these rows of blocks together. This is not easy, as it isn't a straight seam--you have to pivot with each turn, as with sewing the blocks themselves, but at least it's only a small angle. Once you get into the swing of it, though, it's almost easy :-)
Post a Comment